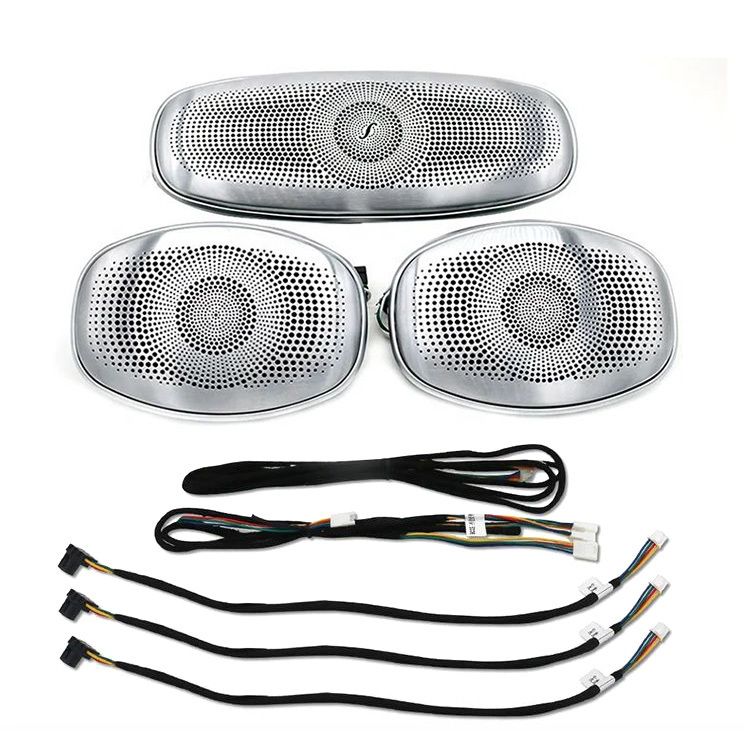
The source guide lists Mercedes-Benz C-Class 205, GLC253, E-Class 213 and S-Class 222. It describes connection to factory or retrofitted ambient lighting. Confirm the exact vehicle, lighting system and kit version before selecting a connection method; the photographs do not establish identical trim, wiring or mounting locations across all four models.
1. Components and preparation
The component photograph shows three grille assemblies, four round speaker units, wiring and fixing screws. Use the supplied parts list to identify the light and audio leads for the actual kit. The source's installation sequence mainly illustrates the large headliner speaker assembly; it does not provide separate mounting sequences for the two smaller grille assemblies.
If other compatible retrofits are already installed, the source allows the light-unit wiring to connect to those retrofit circuits without a separate driver module. It also allows the headliner speaker wiring to connect to a compatible illuminated front reading-light speaker retrofit. These are conditional connection options, not a statement that every lighting or audio circuit can be joined directly. The source does not specify electrical ratings, connector cavities, polarity or compatible retrofit versions. Confirm those details before making connections.
Before marking or making openings, inspect the factory wiring above the headliner and move it clear of the work area. The source requires a positioning template but provides no dimensions, hole sizes, cutting limits or clearance measurements. Obtain the correct template and mounting instructions for the actual kit and vehicle before drilling or cutting.
2. Lighting and speaker wiring references
The wiring illustration uses red for the ambient-light route and yellow for the speaker route. These colored lines identify routes on the drawing; they do not assign wire polarity or voltage.
The source gives three lighting-system branches:
| System named in the source | Connection location described in the source |
|---|---|
| C-Class / GLC, 3-color or 12-color ambient lighting | Extend the light-strip leads to the center-console ambient-light harness, or to the door-panel extension harness. The source calls for matching wire colors and joining in parallel. |
| S-Class, “807 system” | Extend the ambient-light harness to the center instrument-panel area and join to the factory ambient-light harness with matching colors. |
| “New E / New S,” “808 system,” 64-color ambient lighting | Extend the ambient-light harness to the ambient-light connection at the right-side storage compartment shown in the illustration, matching colors at the connection. |
“807” and “808” are the source's system labels. No model-year mapping, connector pinout or electrical specification is supplied. Verify which branch applies to the actual vehicle rather than inferring it from a model name or color count alone.
For audio, the source refers to the midrange speaker harness. It describes joining to that harness on a vehicle with an existing speaker upgrade, or to the factory midrange-speaker wiring on a vehicle retaining the original speakers. “Midrange” describes the speaker type; it does not identify a center-mounted speaker. The source does not specify an amplifier channel, impedance, polarity or adapter pinout.
3. Illustrated trim removal: source steps 1–10
Follow the vehicle-specific service procedure for releasing these parts and any associated electrical connections. The source photographs show the following sequence on the example vehicle:
- Remove the retaining clip shown at the grab handle.
- Remove the grab handle. The source repeats this operation for the four handles in the example vehicle.
- Release the door weatherstrip shown. The source repeats this at the doors.
- Release the marked lower trim, repeating on both sides as illustrated.
- Release the marked upper trim, repeating on both sides as illustrated.
- Release the passenger-side sun visor/vanity-mirror assembly shown; the source repeats the operation on the driver side.
- Gently release both sides of the illustrated retaining clip. The source notes two layers inside the clip and calls for light release on both sides; repeat on the driver side.
- Remove that clip, repeating on the driver side.
- Release the other illustrated visor clip and remove the passenger-side visor assembly; repeat on the driver side.
- Remove the overhead glasses-holder assembly shown.
The arrows and circled areas identify the particular clips in the example photographs. They do not establish a common clip type or removal direction for every listed model.
4. Headliner access and mounting: source steps 11–19
- Release the clip shown and remove the example vehicle's dashcam assembly. The source does not identify this as a card-reader clip.
- Remove the interior rearview mirror using the tool shown, following the applicable vehicle procedure.
- The source repeats the same mirror-removal photograph and instruction under this number; it does not describe a second separate operation.
- Release and remove the small trim fitting shown above the door opening; repeat on the other side.
- Release the clips around the glasses-holder opening and the headliner perimeter as illustrated.
- Lower the headliner as shown and raise the sunroof as directed by the source. The illustrated headliner movement is downward, not upward.
- Place the supplied mounting bracket above the headliner.
- Mark the positions using the correct supplied positioning template, then make the specified openings only after confirming the kit's dimensions and clearing the factory harness above the headliner. The photograph shows the template and resulting openings; it gives no drilling or cutting measurements.
- Seat the headliner/clips and secure the screws as described in the source. Use the kit and vehicle instructions for the required fixing method and tightening values.
The photographs give an overview of access and mounting. They do not provide a complete procedure for adjacent restraint-system components, headliner support, sunroof clearances or model-specific clip and mirror removal. Obtain the relevant service information before dismantling those areas.
5. Connections, reassembly and checks: source steps 20–23
- Connect the headliner speaker wiring to the confirmed midrange speaker wiring. The source suggests connections on both sides. Connect the headliner ambient-light wiring to the confirmed ambient-light harness using the applicable system branch above. The drawing distinguishes the audio and light routes; it does not provide a connector pinout or authorize connecting by appearance alone.
- Refit the headliner and the removed trim using the preceding sequence and the applicable vehicle instructions. Check that wiring is clear of fasteners, moving parts and the openings made during installation.
- The source calls for connection to a Mercedes diagnostic computer and clearing fault codes. Arrange the appropriate diagnostic check, identify and correct any installation-related faults, and retain the findings before clearing resolved codes. The source supplies no diagnostic tool procedure, coding values or fault list.
- The final photograph shows the installed illuminated grille. Check the installed lights and speakers, the affected factory lighting/audio functions and the operation of the removed/refitted equipment. A finished photograph alone does not verify those functions.
6. Troubleshooting
A speaker produces no sound: inspect the speaker wiring and check that its plugs are fully seated. If only one unit is affected, the source suggests comparison with another matching unit to distinguish a unit fault from a connection fault. Also check the original speaker at the adapter connection. Confirm that the units and circuits are compatible before exchanging them.
The headliner lights do not illuminate: inspect the light-unit wiring and check that its plugs are fully seated. If only one light unit is affected, compare with another matching unit as suggested by the source. Also check the factory ambient light at the connection point. Use the confirmed system-specific wiring reference when investigating a fault.